Have you ever wanted to start your own garden, but excuses stopped you before the thought became a real idea? I’ve known it would be an enjoyable hobby and environmentally friendly to grow some of my own food but I thought “it’ll cost too much” or “I don’t have the tools.” These thoughts had me stuck for years, but I have now finally decided to start a garden on my student budget.
Beginning the process – Start with considering some simple spatial questions like how much outdoor space do I have to utilize? and do I have outdoor space that receives adequate sunlight throughout the day?
I don’t have a fenced backyard, but I do have a south facing front yard that begins to receive sunlight early in the morning and doesn’t fade till the sun sets. I have a space roughly 15 feet by 5 feet to the left of my front porch with plenty of space so I decided to start there. The next thing I decided was that it would be wiser to build a planter box since I’m renting and I don’t know the soil history of the yard. After these questions are addressed, it is time to start making some moves.
Acquiring supplies – It doesn’t take much to create a nice garden and if you don’t need a planter box, the list of components is even shorter.
In order to build an 8’ x 3’ x 1.5’ planter box, you will need:
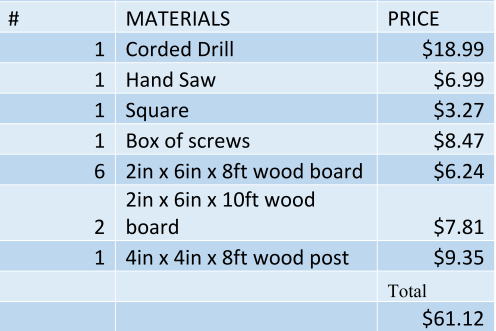
Table listing materials, price, and quantity.
Beginning the build – First things first, I measured, marked and cut the 2 foot posts and the 10 foot boards into 6 – 3ft 3in long boards. I then began with the short sides. I put the 2 foot posts, a couple inches short of 3 feet apart, placed a 3 foot board at the top, made sure they made a 90° angle and screwed them together. After the first was on, I simply placed the other two on and screwed them into place.

The 3-foot sides attached to the 2-foot posts.
After I had constructed the two short sides, I stood them on their sides and attached the 8ft boards to make a rectangular box.

Attaching the 8-foot boards to the sides of the 2-foot post to make a rectangle.
Because the planter box is going to be sitting outside, I decided to apply wood stain to help the wood last longer in the elements.

Planter box after two coats of Varathane Brand wood stain.
Most wood stains are toxic if directly ingested, but when given the proper amount of time to dry, it becomes safe to add your dirt and seeds! If you are curious for more information, check out some woodworking related websites like Popular Woodworking.
Next step – Buying soil for your garden. This is the step that can often be costly if you are purchasing your garden soil from a well-known landscaping company that insists on delivering the soil to your home. I decided to see if I could find an alternative, cheaper option, so I jumped on the web. I found a local, family owned company called Rio Rancho Tractor Service, that keeps topsoil, manure and mixed soil for $30 a truck load if you can haul it yourself.
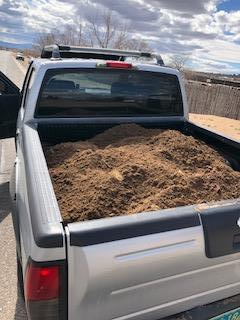
Loading my truck was super easy and quick, thanks to Steven Espinosa at Rio Rancho Tractor Service.
If you are an aspiring gardener, or have any dirt/manure related projects, I definitely recommend checking out Rio Rancho Tractor Service’s Facebook page.
Placing the planter box – I dug holes for each post, placed the planter box and then backed my truck right up to it.
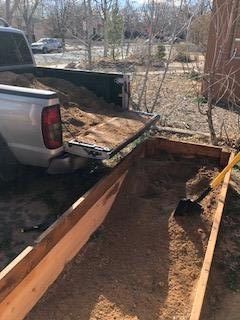
Once the post holes are dug and the planter box is in its spot, start shoveling!
Choosing and planting – Now comes the fun part, planting! If you are a beginner and don’t quite know what to start with, check out your county’s extension agents. If you’re in New Mexico, utilize the Bernalillo County Cooperative Extension Service!
I chose to plant some garlic, potato, and shallots bulbs, along with tomatoes and leafy green starters from Rehm’s Nursery and Garden Center. After everything was in the ground, it was time to water and watch them grow!


The area where I live hasn’t seen its last frost yet so I bought a wall-o-water set to ensure my tomato plants would survive the cold nights. The wall-o-water is a simple way to utilize passive solar energy to keep warm climate plants comfortable through the frosty days.


Good luck, now it’s your turn! – Hopefully I’ve proven the point that starting your own garden isn’t that hard. In total, constructing my planter box took one weekend and it cost just under $120. If a busy, full time student like myself can accomplish completing a project like this in my budget, then you can too. Just don’t forget to water daily!
-posted by Jason
*all photos by author
